
How to Heat a 3D Printer Enclosure
It’s either winter or you just need a warm and cozy place for your prints to flourish… alas you need to figure out how to make a heated enclosure. You’re in luck—Creating a heated environment is not actually that hard! There are a few main components to think about. Heat source, power and a thermostat. Other important things to consider for your environment are smart cooling and heavy-duty recirculating air filtration
Parts List
110V 70W Ceramic Heater w/fan
W1209 Temperature Controller
AC-DC 12V Power Converter
AC Male power receptacle w/toggle switch
Wire splitter
24 AWG wires
18 AWG wires
Bolts and nuts
You can find most of these items on Amazon. We provide all of the necessary parts in a kit to make it easy to build: DIY Smart Heater
If you’d prefer to get a pre-built polished 3D Printer Smart Heating system that’s ready to install, we have one for you here:
Smart Heater
The Heater
There are many different ways to create and emit heat for an enclosure: conductive vs non-conductive ceramic heaters, heaters with built in fans, heaters requiring external fans, peltiers, and more. We chose one that requires the least amount of work while providing a safe and reliable heating system: the non-conductive ceramic heater with a built in axial fan.

Non-conductive 110V PTC 70W Ceramic Heater w/fan
The Temperature Controller
Having a heated environment is more than just turning a heater on and off, you want to be able to set a temperature and have a controller turn the heater on and off based on that temperature setting. You can do this with a microcontroller like ESP32 or Arduino, but since the goal is pretty simple, we’ll use a W1209 Temperature controller. This low-cost 12V controller has a built-in relay and temperature gauge which can toggle your heater on and off with a pretty simple wiring and easy-to-use push buttons.
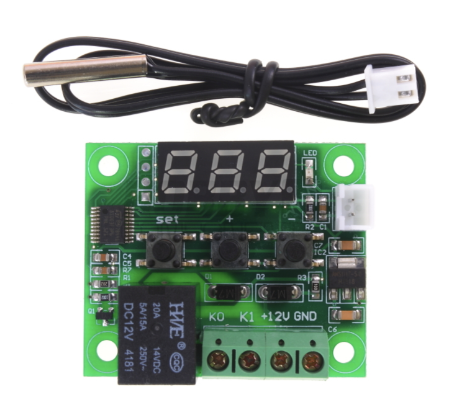
W1209 Temperature Controller
The Power Converter
Powering a 110V ceramic heater requires a direct 110V AC power source from a wall socket however, the controller is 12V, son instead of having a 12V power source and a 110V power source, we can combine the two using a 110V-to-12V AC-DC power converter. This way we get a 110V source of power and split it into a 12V source for the controller and a 110V source for the ceramic heater. Here is the one we chose. Notice the left side get a N and L AC 110V input and the right side delivers 12V DC output.

AC-DC 12V Power Converter for stepping down 110V AC
Build a simple 3D printer enclosure heater with these 3 parts
Wire the W1209 Temperature Controller
Bolt the AC power receptacle to the printed face plate then connect the temperature probe to W1209 Controller.

Push the positive and negative 12V lines into the “+12V” and “GND” terminals and screw tight.
Push the red power line from the power receptacle into the “K1” terminal of the controller and screw tight.
Run the red and black lines from the heater into the plastic body and connect red line into terminal “K0”.

Attach wired controller to faceplate
Now that the controller is all wired, place buttons on the controller (from inside). Insert long 25mm bolts from the front and use tape to hold them in place. Add plastic standoffs and mount controller with nuts. Tigthen.

Mount the AC-DC power converter
Screw the AC-DC power converter to the plastic body and connect the 12V lines and AC line from the power receptacle to the AC-DC power module. Push temp probe through hole at bottom right.

Connect the black lines and close lid
Connect the black line from the ceramic fan to the black line from the power receptacle. Make sure to push the line all the way in each end of the connector.

Power on the your new heater and configure to “Heat” setting
Press and hold the leftmost button. Click the left button again and make sure that the unit is set to “H” (by default they are usually set to “C” which is for cooling).

Mount heater inside your unit
Mount the heater onto the angled bracket.
Recirculating the air heats faster and warmer while bringing heat in from he outside doesn’t create as warm of an environment since it has to constantly heat cooler air. If your heater is inside and your control body is outside you’ll need to cut and reconnect lines through a wire splitter so to make it easy we just mount everything inside and connect the heater with a bracket to recirculate heat.
