
How to Cool a 3D Printer Enclosure
PLA or soft materials printing sometimes suffers from too warm of an environment. Another possible issue with an enclosure that is too warm is that the safety of your electronics—electronics are not meant to be in a hot environment. An exhaust fan for your enclosure will fix the issue by removing hot air whilst bringing in cool room temperature air. While doing this you want to make sure that you are filtering the air coming out of your enclosure to not flood your room with particles and nasty smells. You also want the ability to set an ideal temperature. You’re in luck—Creating a Smart Cooler is not actually that hard! There are a few main components to think about. Cooling fans, and a thermostat. Other important things to consider for your environment are a Heavy-Duty Recirculating Air Filtration system (or DIY version).
Parts List
(2) 80mm axial fans (intake, outlet)
W1209 Temperature Controller
Barrel jack
Rocker switch
18 AWG wires
80x80mm HEPA/carbon filter
Inlet cover with dust filter
12V/1A adapter
Bolts and nuts
You can find most of these items on Amazon. We provide all of the necessary parts in a kit to make it easy to build: DIY Smart Exhaust
If you’d prefer to get a pre-built polished 3D Printer Smart Cooling system that’s ready to install, we have one for you here:
Smart Cooler
The Cooling Fans
There are many different ways to cool a cabinet: blower[centrifugal] fans, axial fans (To learn about axial vs centrifugal fans check out “Axial vs Centrifugal Fans”<link>). We chose one that requires the least amount of work, lowest cost and most common materials: 2 low-pressure axial fans with a thermostat.

Non-conductive 110V PTC 70W Ceramic Heater w/fan
The Temperature Controller
Having a cooled environment is more than just turning a cooler on and off, you want to be able to set a temperature and have a controller turn the cooler on and off based on that temperature setting. You can do this with a microcontroller like ESP32 or Arduino, but since the goal is pretty simple, we’ll use a W1209 Temperature controller. This low-cost 12V controller has a built-in relay and temperature gauge which can toggle your heater on and off with a pretty simple wiring and easy-to-use push buttons.
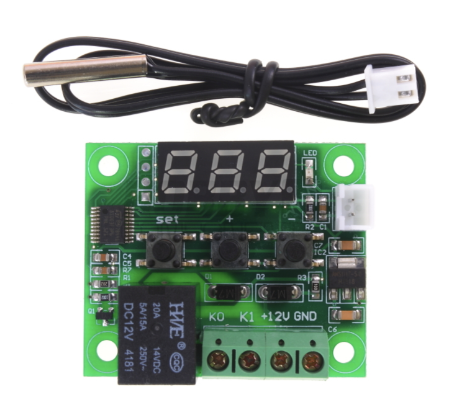
W1209 Temperature Controller
The Filters
Cooling your environment requires the fan system along with the thermostat, however it’s very important to mitigate the fumes and particles being released from any 3D printing environment. While filtering we also don’t want to introduce any dusty air coming from outside the enclosure so we are adding a dust filter with cover. This filtration is a bare minimum though, you should always have a heavy recirculating filtration system with a heavy layer of activated carbon to work through the air before it is exhausted. Here is a DIY version or a ready to use heavy one. Replacement filters are here: filters

Air goes through HEPA then through an activated carbon fabric
Build a simple 3D printer enclosure cooler with these 3 parts
Solder the barrel jack terminals
Slip a heat shrink piece onto each line (red and black) then solder the red line to the “L” shape and the black line right above as shown in the picture below. Slip the shrink tube over each terminal and warm gently with a blow dryer or a lighter.

Wire the W1209 Temperature Controller
Connect the temperature probe to the controller and connect each the lines to each screw terminal as shown below. Make sure to tighten them.

Attach wired controller to body
Attach barrel connector to left hole using nut on inside then place controller into the body and bolt it with 1 countersunk screw and nut (nut goes on the inside).
There are 2 identical JST male connectors. Push one of the "male” JST connectors through the square hole on the side and the other through the bid circular hole in the middle.
Connect the rocker switch to the right side hole and push both spade connectors onto the terminals (order doesn’t matter since you are just creating an open/closed circuit)
Push temp probe through large circular hole in the middle (same place where one of the male JST connecters went)
Finally, Insert the 3 small buttons onto the controller.

Install faceplate
There are 2 fan supply lines. Push one fan supply line through the small rectangular hole and the other through the big circular hole in the middle of the unit. Also push the thermostat through the middle circular hole (this hole will go through your enclosure).

Drill holes for fan and supply lines
Drill an 80mm (3 inch) hole where you’d like the exhaust fan to be, then install the fan. Drill the same size hole on the opposite end of your enclosure—this is the “intake”, supplying cool air. Make sure this hole is placed in a place where you are not introducing a draft to your prints—Remember heat rises, so sucking out air from the upper side of your enclosure is the best way to remove hot air and not interfere with your print.
Finally, mark and drill all the small mounting holes (3mm or 1/8”) and supply lines hole (12mm or 1/2”).
Mount cooler controller and fans
Mount the controller unit with 3mm bolts and nuts, connect it and turn it on. Set your temperature by clicking the left button on the controller. Mount the fan with the shorter line on the outside and connect it to the power JST line coming from the square hole. Mount the
